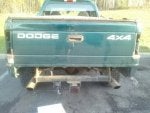
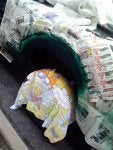
Dakota Durango Forum banner
21 - 40 of 78 Posts
Discussion starter · #21 ·
very nice. and jamie, if you want big pics, upload them to facebook and then on here ill walk you through how to post them so they become big
Thanks Jay! I mostly do it this way bc my work blocks facebook :nono: :cursin: How else am I supposed to get through my work day? LOL :jester:
 
Thanks Jay! I mostly do it this way bc my work blocks facebook :nono: :cursin: How else am I supposed to get through my work day? LOL :jester:
hahahahahahahahahahah
 
Discussion starter · #24 · (Edited)
I need one of those girls
 
Discussion starter · #28 ·
Discussion starter · #29 ·
Some progress throughout the last month. Slow going.
 

Attachments

Discussion starter · #30 · (Edited)
Well. Fenders and bed body work all painted. Needs little more sanding and buffing.
 

Attachments

Discussion starter · #33 ·
more pics to come today once I get them pulled off my phone.


your hired
$20/hr? LMAO. Too hot down there, but if I would come down, you better be playing the Devil went dow to Georgia, and we are raisin all kinds of hell!
 
more pics to come today once I get them pulled off my phone.


$20/hr? LMAO. Too hot down there, but if I would come down, you better be playing the Devil went dow to Georgia, and we are raisin all kinds of hell!
ummmmmm you know it. and body work, shit its better than that
 
ummmmmm you know it. and body work, shit its better than that
LOL ohhh yeah $20/hr is more like internship pay! I've heard a few guys at the shop I have an interview at tomorrow are getting paid $35+ with some years under their belt.

BTW, great work on your truck. Inspires me to work on my '00 club cab but I'm just done with it overall. Time for something new and better on gas.
 
Discussion starter · #36 ·
Thanks so much guys! I want to post em to here from facebook, but work doesn't allow facebook :boid: We can watch youtube though! :woot:


I am gonna try and make a timeline here so the pics will go from tear down, patch up and paint. Here goes nothin!

These should be self explanitory, but this was in front of the driver's rear tire, bottom of wheel well arch. Used part of a cab corner patch to replace swiss cheese!
 

Attachments

Discussion starter · #37 ·
Some icing on the patch, a few light layers to build enough up then sand to get everything smooth and even. Also, rear bumper removed.
 

Attachments

Discussion starter · #38 ·
Hillbilly workbench for paint mixing, plywood across toolboxes. Same for fender support table plywood on sawhorses. Some primer and a rugrats towel!
My buddy Tony helping out.
 

Attachments

Discussion starter · #39 · (Edited)
Shootin the green on! R/T wheels on. Yuck the frame, inside and underside need some paint now. POR15 and Rustoleum time!

The flare will cover all the ugly that I didn't have time to fix. Hate cutting corners and being cheap ass or whatever else you wanna call it, but, OHIO, that is all I'm gonna say. Not trying to make a show truck, just all one color and no rust! :)
 

Attachments

Discussion starter · #40 ·
More green, on fenders and driver side tail light area.
 

Attachments

21 - 40 of 78 Posts