Dakota Durango Forum banner
1 - 20 of 21 Posts

Blue Basher

· ಠ_ಠ ლ(ಠ益ಠ&#
Joined
·
1,054 Posts
Discussion starter · #1 ·
Today I did this...

(THIS IS A POSITIVE MOULD) -meaning none of this will go in the truck.

template
Image

the top is shorter in length to give it a slight taper
Image

all the pieces cut out
Image

glued/screwed I used 5min epoxy to told it together before I hit it with the screws
Image

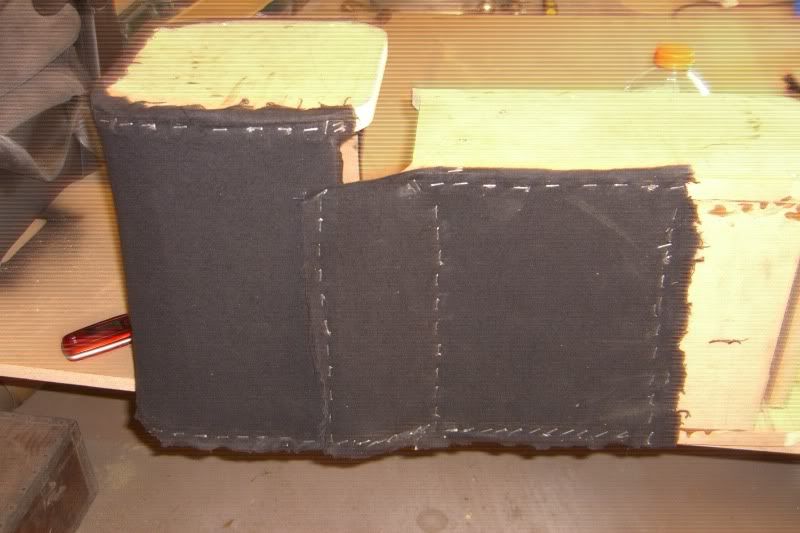
starting to cover it in flanel I got from wally-world
Image

Image

The first layer finished
Image

the second layer pulled from front to back and back to front and top to bottom
this helped give a smother taper and cover alot of the staples.
front
Image

the little wrinkle was fixed but it was hardly noticeable
Image

back side
Image


It looks crappy lol but its my first time working with somthing this complicated, and I have never pulled fabric.

The only thing I have ever done with fibreglass was make a 18ft flats boat but that was more like laying down sheets of fibreglass over the plywood hull and cover with resin sand and repeat.

Tomorrow I will get the resin on it. The only reason I didnt tonight was because i dont think I have enough to cover everything in a heavy coat.

more pics tomorrow :stirthepo

ps: sorry for the crappy pics my camera is spazing out on me... 7.2MP my ass:rant:
 
Discussion starter · #3 · (Edited)
yes but that comes after lol

I know I should have made the compartments before I pulled the fabric but the top half with the lids is going to be made seperatly. the console will be a 2 piece
with removeable compartments.

and i need to be able to take off the top half to mount it to the floor and to eventualy take it out when I make another console

The top will have a compartment and the lid will have on open tray to keep things in like a cell phone.

The lower side will have a paded arm rest and at the front I have a piece of accrylic that I have painted black. I took it to a laser engraving shop in town and she is going to burn my family crest into it.

on either side I will have low profile switches (havnt found exactly what im looking for yet) for various things like bed lights trail lights and anything else I feel should be added.


I think once I get more experience with this Im going to make a new one thats got a little more taper and angles and the split level will have a longer slope. I might even tie in the OEM cup holders.
and rounded edges.

but we gota start somewhere IM A NOOB AT THIS lol

think of this as a trial run.
 
looking pretty good. :mullet:
 
Discussion starter · #11 ·
Update:
the bastard consoles...
Image


The new one flat top dont mind the resin... to much hardener heated up the can I was using so I plopped the whole batch out on top in hopes to spread a little more before it turned into a good ball it will come off when I sand it
Image

Image


I got a gal of kitty hair and a gal of regular bondo im gona start sanding in the morning hopefully before my deadbeat brother comes into town and holds me back for a few days.

I contemplated adding a slant to the whole top insted of having a split level. At this point I can still add the slant by stacking MDF

Im thinking a 2"-3" rise over a 26"run would it be worth it for the looks?
 
If you want to. I personally like the split level look. Good work
 
Discussion starter · #13 · (Edited)
Well I do to but they are a pita to cover and adding a lid would also be way to much work FOR THE MOMENT lol thats not to say I wont In the future.

My plans are to make a full consonle that replaces the stock cupholders and ties into the back seat.

Iv got an interesting I dea for the back seat to keep it stock looking but still have good sound.

If I ever get arround to it (unlikely) but, its going to Involve down firing subs and raising the back seat 3" and to top it off it should look stockish I hope
 
Discussion starter · #15 ·
me to lol I change directions every freeking day! Hopefully if all goes well and I learn enough from this Il go ahead and do the unit i was thinking abbout.

Think Darrens but cheeper and more stock looking in the back seat.

once things get cleared up Il be able to devote more time to this stuff...TR6, other tuck, friends truck, misc home stuff. for being 17 I feel 45
 
Discussion starter · #16 ·
Update:
il have pics later today.

I used kitty hair to fill in most of the larger areas and at the moment im working with regular bondo on smoothing and rounding the corners still ALOT of filling involved.

once thats done I will pour a milkshake over it and start prepping it for the first layer of fibreglass cloth.
 
Discussion starter · #18 · (Edited)
yeah lol iv been swamped with work and my brother coming in town here is where im at, 90% smoothed just working on the last few rough spots, then it gets a milkshake coat then im going to start glassing the actual unit.

pics in a second- seconds later

Image

Image

Image

Image

Image


I had to drive my half brother around today so to keep from getting boored I gave him some lessons on how to make knives so he wouldnt be boored while I sanded. He's 21 and lived in Jensen beach all his life and is pretty much helpless in a shop.

Top knife blank is mine the bottom is his. he also put an edge on his
Image
 
Discussion starter · #20 ·
because im cheep- this wont have to hold up to anything as its just a mould. For the unit thats going in the truck Iv got a gal of Rage for smoothing.

yeah yeah i know bondo cracks but like I said its the mould and will have milkshake poured over that too.
 
1 - 20 of 21 Posts